Chapter 11 Lab Exercises
Section 7 Colorimetric Measurement of Biofilm Density
Page 3 Student
Copyright © Alfred B. Cunningham, John E. Lennox, and Rockford J. Ross, Eds. 2001-2010
Colorimetric Measurement of Biofilm Density
Student Version (go to Instructor Version)
Supplies Needed:
Materials
|
Quantity |
Description |
| As Necessary | sterile, 24-well polysterene plates |
| As Necessary | Tryptic Soy broth or LB broth, 1/10 strength |
| As Necessary | 95% ethanol |
| As Necessary | 1 % aqueous crystal violet dye |
Equipment
|
Quantity |
Description |
| 1 | laboratory spectrophotometer or colorimeter |
| As Necessary | cuvettes for the above |
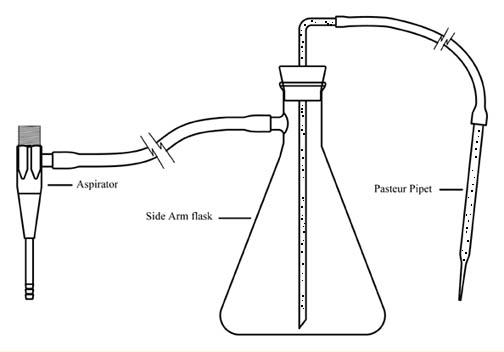
| 1 | vacuum suction device (see diagram in Student Instructions) |
| As Necessary | pipettes - 2 ml and 5 ml volumes (need as many pipettes as you have wells) |
| As Necessary | i. PiPumps - 2 ml and 10 ml volumes or other pipetting devices (Note: Under no circumstances should mouth pipetting be permitted.) |
| As Necessary | rubber/latex gloves |
Instructions:
Growing the biofilm
- With a sterile pipette, and a 2 ml PiPump, transfer 1.8 ml of 1/10 strength Tryptic Soy Broth or LB broth into 2 wells of a 24 well polysterene plate.
- Inoculate one of the two wells with 0.2 ml of a microbial pure culture, a soil suspension1, or some other material as indicated by your instructor.
- Place the plate on a platform shaker or a tilt table. Agitation has been observed to produce denser and more robust biofilms. Incubate for 24 hours or longer.
- Soil suspensions may be made by transfering 1 gram of soil into 100 ml of sterile distilled water. Shake the suspension and allow it to settle for 1-2 minutes. With a sterile pipette withdraw a 0.2 ml sample from the liquid.
Estimating biofilm mass
- From this step on, use latex or rubber gloves.
- Using the vacuum device suction liquid from the culture in the two wells, but do not let the wells dry out. Be careful not to damage the biofilm adhering to the side and floor of the well.
- Wash the wells by filling the wells with tap water and dumping the wash water into the sink or into a designated waste container, depending on the virulence of the organism used.
- Repeat step f twice more.
- With a 5 ml pipette add 2 ml of 1% crystal violet (CV) dye solution to each well and stain for 5 minutes.
- Using the same vacuum device (step e), remove the CV dye from each well.
- Wash the wells 3 times, as in steps f and g.
- Drain all of the wells.
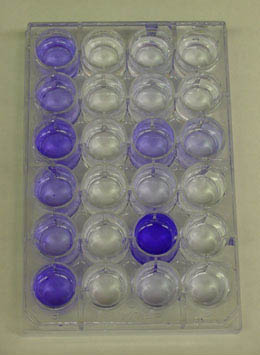
- Observe the distribution of CV dye on the walls of the microtiter wells.
- Add 2 ml of 95% ethanol to each well to re-elute the CV dye. If a platform shaker is available, shake gently for two minutes. If a platform shaker is not available, manually shake the polysterene wells until all the crystal violet dye is re-eluted.
- Transfer the ethanol/CV solution to an appropriate cuvette with a pipette and add 2 ml of fresh ethanol to bring the volume to 4 ml.
- Measure the absorbance of the ethanol/CV solution at A 570-600. Remember that you have diluted the original culture volume 1:2, so it is necessary to double the absorbance reading.
- The absorbance of the uninoculated well represents the negative control. This value should be subtracted from the value for the inoculated well.
Illustrations:

Figure 1. A 24 well dilution series.
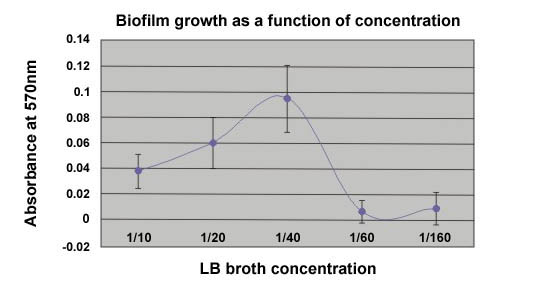
Three students did an independent study project using the technique described here to determine the optimum nutrient concentration for the production of biofilm on 24 well polysterene plates. The following graph is a result of their effort.

Figure 2. Illustration of vacuum suction device

Figure 3. An example of the effect of nutrient
concentration on biofilm formation.
Educational Program Curricula and Teaching Resources
Supported in part by the Waksman Foundation for MicrobiologyDeveloped in collaboration with Dr. John Lennox, Penn State University-Altoona
©1999-2006 Center for Biofilm Engineering, http://www.biofilm.montana.edu
