Construction of a Winogradsky Column
Instructor Version (go to Student Version)
| Subject Area(s) | microbiology |
| Intended Audience |
high school biology, independent study/science fair, introductory undergraduate microbiology, advanced college level microbiology. |
| Type | Laboratory Exercise |
| Revision Date | April 11, 2008 |
CONTENT
Sergei Winogradsky (1856-1953) was among the first microbiologists to investigate the organisms found in complex biofilm communities, and provided some of the first descriptions of sulfur, iron and nitrogen metabolizing bacteria as well as those bacteria involved in cellulose decomposition.
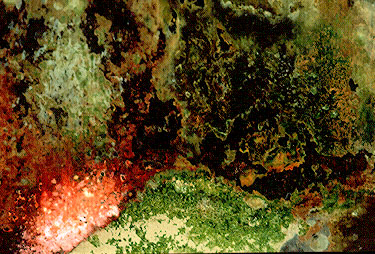
Working in the late decades of the last century, Winogradsky was a pioneer in selective enrichment techniques. One of the strategies that he employed to isolate organisms from nature was a miniature model pond cross section which has since been called a Winogradsky column.
PREREQUISITES
The student should be able to define the term biofilm and distinguish between planktonic and biofilm associated cells. They should be able to distinguish between chemoautotrophic and photoautotrophic bacteria and have a basic understanding of photosynthesis.INSTRUCTIONAL OBJECTIVE
On completion of this exercise, the student should be able to describe the construction of a Winogradsky column and explain how this simulates a model pond ecosystem. They should also be able to explain the environmental factors extant within each portion of the column and describe the sorts of bacteria capable of growing in each zone.MATERIALS AND EQUIPMENT
Quantity |
Description |
| As Necessary | a source of soil or mud |
| As Necessary | a source of water (same source as the mud or other, tap water although it contains a residue of chlorine has been used successfully) . |
| As Necessary | rubber or vinyl gloves |
| As Necessary | metal or plastic pans for mixing mud with other ingredients |
| As Necessary | spatulas |
| As Necessary | sources of carbon (i.e. some, such as calcium carbonate and chalk are rapidly metabolized while others such as shredded paper and saw dust are metabolized more slowly) |
| As Necessary | sources of sulfur (e.g. elemental sulfur, sodium sulfate, raw or hard boiled eggs, sodium sulfide) |
| As Necessary | a bottle (2 liter soda bottle) or other tall, clear container (wide mouth containers are preferable). |
INSTRUCTIONAL PROCEDURES
The column is constructed in a tall clear glass or plastic container. Tall wide mouth bottles are probably best, but 2 L soda bottles are easy to obtain in large numbers and will serve the purpose. Virtually any roughly cylindrical container will serve, even vessels as diverse as olive jars, wine bottles and twenty-liter carboys. The column is constructed in a tall clear glass or plastic container. Tall wide mouth bottles are probably best, but 2 L soda bottles are easy to obtain in large numbers and will serve the purpose. Virtually any roughly cylindrical container will serve, even vessels as diverse as olive jars, wine bottles and twenty-liter carboys. The column is constructed in a tall clear glass or plastic container. Tall wide mouth bottles are probably best, but 2 L soda bottles are easy to obtain in large numbers and will serve the purpose. Virtually any roughly cylindrical container will serve, even vessels as diverse as olive jars, wine bottles and twenty-liter carboys.The column is packed with soil or mud from virtually any source and water from the same or a different source. If at all possible, the students should collect their own mud and water from a local lake or pond, so that they have a sense of the natural habitat from which these materials were obtained.
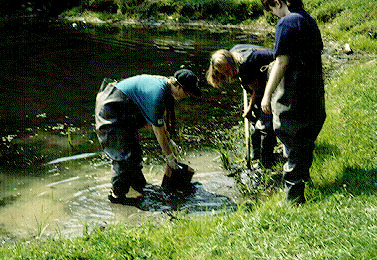
Mud or soil can be collected at any time of year. Pond mud collected through the ice in the middle of winter has produced beautiful columns. Stones and sticks should be removed by screening or by hand. Water may be collected from the same source but distilled water or tap water will also serve.
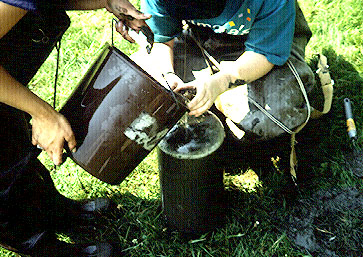
To these natural components, the student will add supplemental carbon and sulfur. These may be either slowly or rapidly utilized materials and student are encouraged to use their own imagination in selecting carbon and sulfur sources.
Above the soil is a layer of water representing the pond itself, and the column is usually covered (but not sealed), to retard evaporation. Any commercial plastic wrap works well. Secure the plastic wrap with a rubber band. A slit or two should be placed in the wrap to permit gas exchange. The entire column is then illuminated to encourage the growth of phototrophs. The columns should be placed in a well ventilated area because they can smell until they stabilize. The resulting growth of microorganisms can be quite spectacular and colorful. The light source can be a matter for student discussion. Natural or tungsten light sources will work, although the different spectra of each will affect the nature of the bacteria selected.
The most obvious inhabitants of the column are aerobic and anaerobic phototrophs, but a vast array of heterotrophs are also found. The routine presence of methanogens makes this a useful exercise in expanding the microbial diversity of the introductory microbiology laboratory.
There are also flat plate Winogradsky columns which provide large surface areas for biofilms to develop and are excellent for photographic record keeping
See: http://www.anaerobesystems.com.
The detailed procedure for the construction of the Winogradsky column may be found in the student instructions available at Detailed instructions for students under Attachments.
- Mix the mud/soil with the desired carbon and sulfur sources. SAFETY NOTE: There is no easy way to determine if the mud students collect is contaminated with sewage, farm waste, heavy metals or other toxic materials. Have your students wear latex or vinyl gloves when mixing materials and packing the column.
- Add some water to the container and add the soil mix a little at a time using a glass rod or stick to pack the material in the bottom of the column. Air bubbles should be excluded as much as possible, although any oxygen remaining trapped in the mud is probably consumed by facultative organisms very rapidly.
- Continue to add water and soil, making a slurry until the column is about three fourths full.
Use a wash bottle to rinse excess mud from the container above the soil level and then add additional water to produce a water column (the pond). Leave some air space above the surface of the water and cover the column with plastic wrap or parafilm. Be sure to cut a slit or two in the plastic wrap or parafilm to permit gas exchange. - Place the column near a window or tungsten lamp. Check to make sure that the column is not heated too much by the light. The temperature of the column should not be much above room temperature.
Possible carbon sources:
Vegetable materials such as shredded hay or newspaper, grass clippings, sawdust, corn starch, or oatmeal, will work fine. Use your imagination. These materials release carbon relatively slowly. Fast release carbon sources include sodium carbonate, sodium bicarbonate and calcium carbonate.Possible sulfur sources:
Once again use your imagination. Elemental sulfur, calcium sulfate, magnesium sulfate, raw or hard-boiled eggs, and cheese have all been used with success.Column structure and physiology:
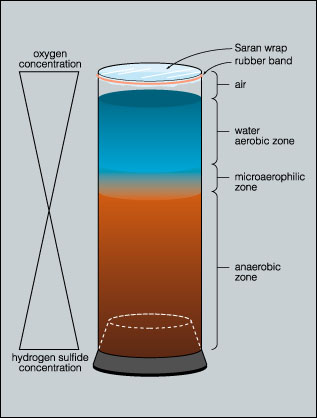
The water column at the surface is in contact with the atmosphere and is therefore aerobic but it becomes increasingly anaerobic with depth. The surface layer of the column may produce an aerobic liquid air biofilm (pellicle) that can be sampled by dipping a coverslip into the column and lifting a portion of the film from the water.
In the highly anaerobic base of the column, decomposition and the activity of sulfate reducing bacteria results in the production of hydrogen sulfide gas. This hydrogen sulfide gradient decreases toward the top of the column. These two gradients (oxygen and hydrogen sulfide) acting in opposite directions, create a continuous range of habitats selective for a variety of microorganisms.
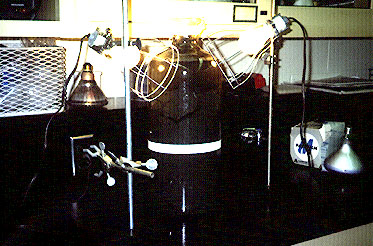
Typically the lower portions of the column are colonized by photoautotrophic green and purple sulfur bacteria. The aerobic surface of the column is occupied by oxygenic cyanobacteria. Just below the surface phototrophic purple non-sulfur bacteria predominate.
The majority of the bacteria are located in a thin film between the soil/mud substrate and the container wall. When using plastic containers such as two liter pop bottles, these bacteria can be sampled by inserting a needle through the container wall, or by freezing the column and cutting into the column with a utility knife and shears to expose the surface layer of the column.
Cylindrical plastic columns, such as those provided by Carolina Biological, can be frozen and the entire contents can be extruded under pressure.

The voltage generated varies with time, but one Winogradsky column in a 20 L carboy generated between 0.3-0.5 volts continuously for three years without supplemental nutrient.

ASSESSMENT / EVALUATION
The success of the column will be evident within a few weeks with the appearance of dramatically colored biofilms of phototrophic green and purple sulfur bacteria just under the glass or plastic layer of the column. At the top of the water column, green algae and cyanobacteria will appear.FOLLOW-UP ACTIVITIES
- Light effects - Have some students mask certain regions of the bottle so that light cannot penetrate (use aluminum foil or cardboard masking). Does this affect the appearance of the column?
- More light effects - Have students explore the absorption spectra of the various types of phototrophs which grow in each region of the column by masking portions of the column with colored gels (consult with your theater department for colored gels used in lighting).
- Recovery of phototrophic bacteria - Carolina Biological sells Winogradsky column kits (FA-70-3490). These use a cylindrical plastic column with a rubber stopper base. These kits are quite convenient and easy to set up. To recover phototrophic bacteria from a column, freeze the established column and then push out the frozen plug into a pan. Microorganisms for microscopic observation or further culturing may be obtained from the plug surface. This could also be done by cutting into a frozen column in a plastic 2 L soda bottle. Use a utility knife or pair of heavy shears with care to expose the column surface.
- Electrochemical potential – Cut two lengths of bell cord wire, one long enough to reach the bottom of the column and the other just long enough to touch the surface of the mud below the water layer. Strip the last cm of insulation from the ends of each wire. Place the long wire in the column so that the lower end rests at the bottom of the column. Place the short wire so that it just reaches the mud water interface. Bend both wires so that they hang over the top edge of the column. Connect the wires to a VOM (Volt Ohm Meter) set to measure voltage in mVolts. You might be able to borrow one of these from your Physics Department. What is the source of the electrical current? Is it chemical or photochemical? How could you decide? Could the world energy crisis be cured by drawing energy from mud flats and bogs?
REFERENCES
Instructions for constructing Winogradsky columns can be found in many laboratory manuals and in informative Carolina Tips (Sept. 1, 1978).
This material is based upon work supported by the National Science Foundation under Grant No. 0618744, and in part by the Waksman Foundation for Microbiology. Developed in collaboration with Dr. John Lennox, Penn State Altoona. Any opinions, findings, and conclusions or recommendations expressed in this material are those of the author(s) and do not necessarily reflect the views of the National Science Foundation.
©2002-2008 Center for Biofilm Engineering, http://www.biofilm.montana.edu
